
Magento may lead the way in terms of features, scalability, flexibility, system security and reliability compared to most other ecommerce platforms, but all of the advanced functionality / features that Magento has comes at the cost of having a large number of files and large databases, as well as a higher number of requests on page load – and, consequently, makes Magento slower than many other platforms.
This post was written by a developer I’ve been working with (with some smaller contributions from me) and is designed to outline some easy to implement steps to optimise your Magento store’s speed and its overall performance. If you need help with this, I also provide Magento speed / performance audits, which will help to identify and resolve issues with your Magento store.
I wrote this piece alongside developers that I work with – if you have any questions or feedback, please feel free to add them in the comments section below or fill out this form and one of us will get back to you.
Need for Optimisation
Where the flexibility and scalability of Magento makes it an obvious choice for large scale Ecommerce solutions, optimising Magento speed remains a challenge for developers, as slow page load times can have a considerable impact on overall user experience and can also cause SEO challenges. The graph below shows the requests made per second by some of the more mid-level Ecommerce platforms, the higher number of requests indicates a faster system.
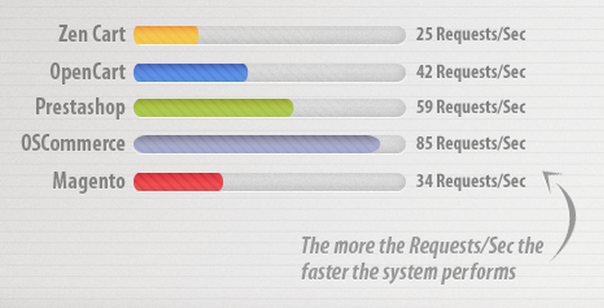
As you can see, Magento is slower and has a lot more requests than the other CMSs, but this should not dissuade you from using it, as it is still the most popular platform in the market, owing to its vast array of out of the box features, as shown in the pie chart below.
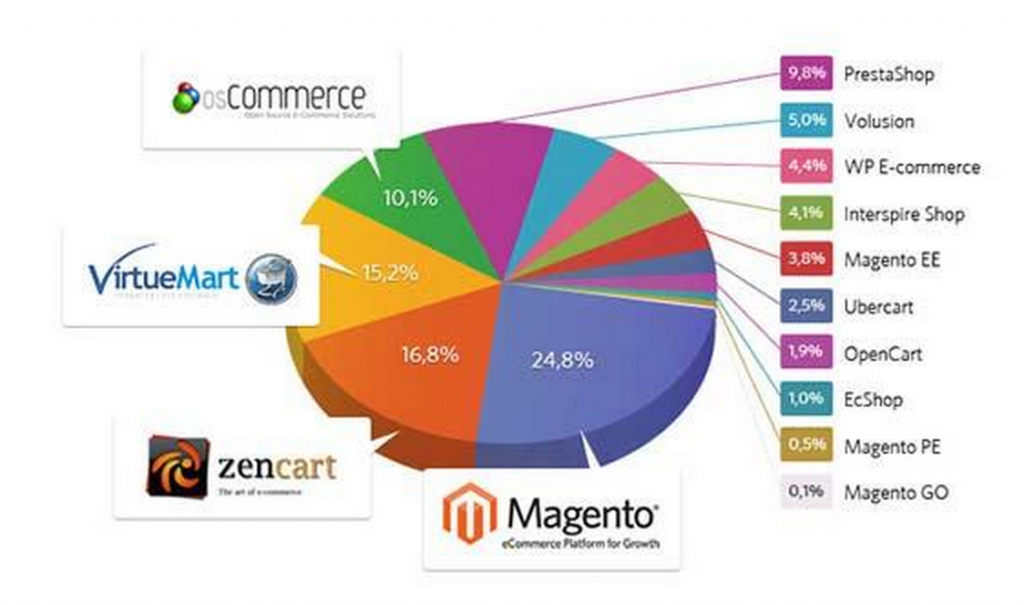
Image Credit: Ahead Works
In the following section, I’ll explain some steps to effectively deal with this drawback of Magento.
Magento Performance Testing Tools:
Before we start looking at the Magento speed optimisation steps, it is better to first discuss the choices you have to determine the actual page load time of your Magento store. Though, a quick Google search query will give you a long list of websites which will provide basic information around your website’s speed, I would recommend looking to use yslow or Google Page Speed Tool, as they are the most widely used tools and will give you accurate results.
If you already have a Magento store, I’d suggest that you check its page load time before you start the following the following performance optimisation techniques, and see how much your website’s performance improves. Don’t forget to provide your feedback in the comments section below.
Another thing to think about is that each of your page templates will have different page load speeds, because of the reliance on different files and front-end assets. It’s important to monitor and test each page type and then use the methods below to optimise each one.
Optimising Magento’s Performance
Server Considerations
If you are in the process of launching a new store and are looking at hosting options for your Magento store, the first step towards optimising Magento performance should be to find a good server, which is suitable for Magento. Really, any Magento store should be using an optimised dedicated server, but if there are cost constraints, as there usually are for smaller merchants, then you should find some reliable shared hosting company which specialises in Magento hosting.
In the past I’ve used Rackspace, Nexcess and Peer1 (all specialists in Magento hosting), as well as SWBroadband for smaller Magento websites. Sonassi also have a really strong reputation in the Magento community.
Admin Panel Changes
The fastest and easiest way to significantly increase your Magento store’s performance is by making some basic changes to the admin panel. The following are relatively easy things to change but can have a big impact on the load time of your website.
First of all go to System > Configuration > Catalog > FrontEnd and select “Yes” for both ‘Use Flat Catalog Category’ and ‘Use Flat Catalog Product’.

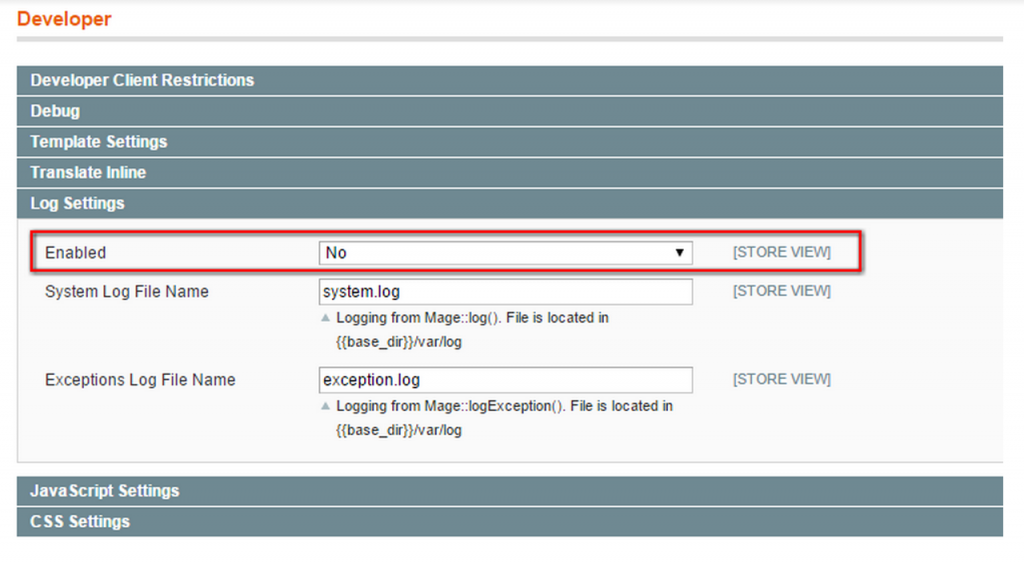
Secondly, we have to disable logging in the log settings. For that go to System -> Configuration -> Advanced -> Developer -> Log Settings and make sure log settings is not enabled.
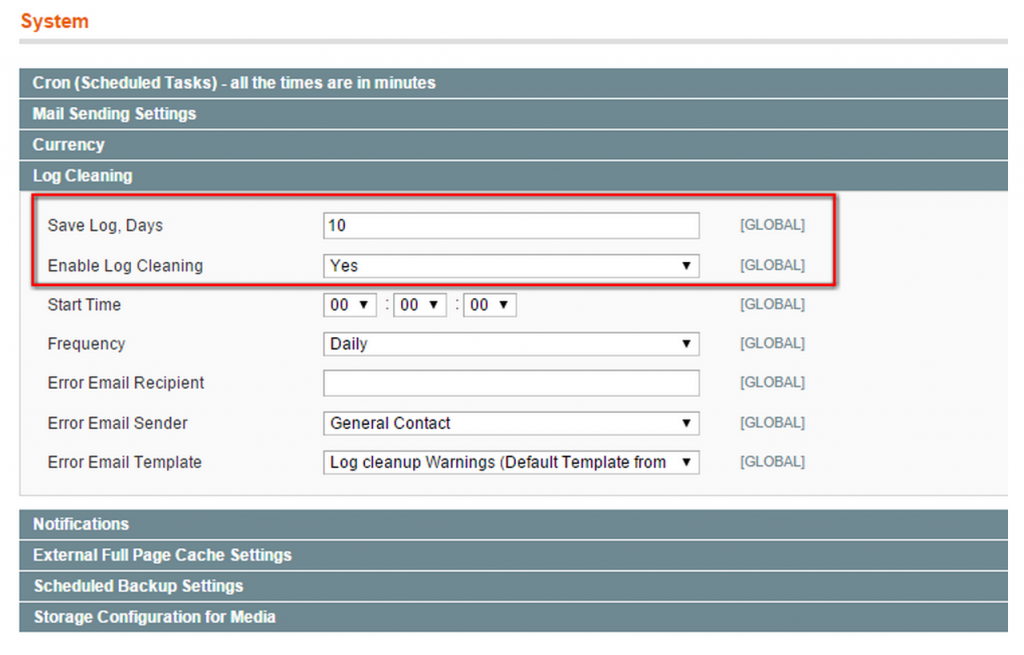
Another important step is to enable cleaning of cron and log at regular intervals. For that go to System > Configuration > Advanced > System -> Log Cleaning, here you should enable log cleaning and set the minimum possible time which is viable for you.
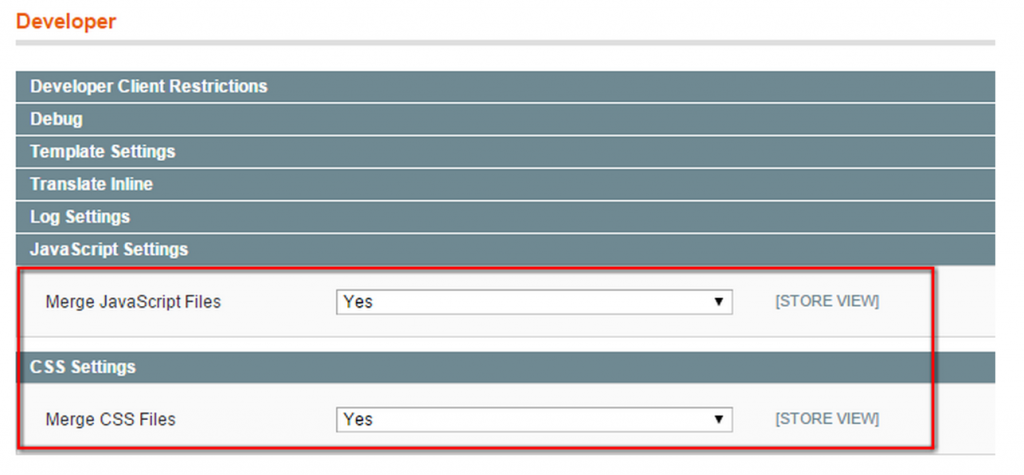
Now, we’ll enable merging of CSS and JS files at the time of page loading. Although this a fundamental step in the process of improving the speed of your store, it can also cause problems, so I’d suggest you don’t look at this without the assistance of an experienced Magento developer.
Making this change will help to reduce the number of requests to the server, which will definitely help to improve page load time. To do that, go to System > Configuration > Developer. Here you’ll see Merge JavaScript Files and Merge CSS Files. Set both these fields to Yes, and hit Save.
Once this is done, we’ll run the Magento compilation process. In this step Magento will compile all of its files to create a single include path, which will help us reduce page load time by up to 50%. To run this compilation process, go to System > Tools > Compilation. In the top-right hand corner, you’ll see the Run Compilation Process button. Click on that and you’re done.

If you experience any problem in running this compilation, please make sure that the directory ‘includes’ and the file ‘includes/config.php’ are both writable.
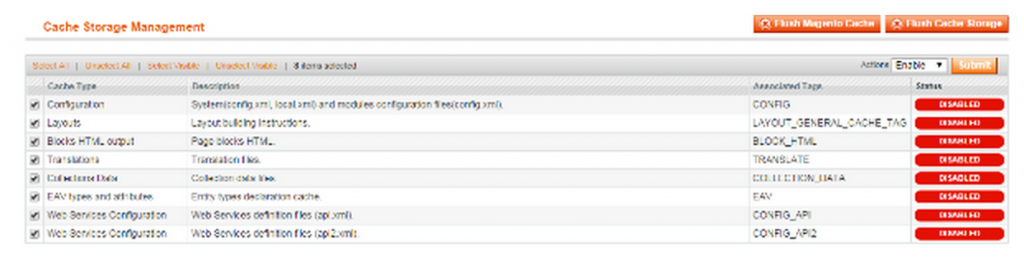
The last change we want to make in the admin panel is enabling the Magento cache. This way Magento stores will load the resources at the first page request, which will allow the use of the already downloaded resources for subsequent page requests being loaded. This will help us to reduce page load time significantly. To enable Magento cache, go to System > Cache Management. Select all cache types and from the top-right corner drop down select Enable and submit.
.HTACCESS Changes
Now, we’ll start making some changes in Magento’s .htaccess file. For this purpose you have to locate the .htaccess file located in the Magento root directory. If you can’t find this, try creating a new one.
This part is only really relevant to Magento websites that are using Apache servers and not Nginx – so this may not be relevant to all readers. Also, people running Magento Enterprise websites are probably not going to be using the .htaccess with Apache because it’s slower.
Through this .htaccess file, we’ll do couple of things. First of all, we’ll add expiration durations in headers. That means, until the duration mentioned in headers is not expired, Magento will keep using cached version of the files, and will not download new ones. Secondly, we’ll do content encoding to compress the files before sending them to requesting agents. As files will be smaller, they’ll be download faster.
First of all, we need to place an expiration limit on the headers, by adding this code into the .htaccess file:
############################################
<IfModule mod_expires.c>
# First of all enable expirations
ExpiresActive On
# Default expiration
ExpiresDefault “access plus 1 month”
# For favicon
ExpiresByType image/x-icon “access plus 1 year”
# Set Images Expiry
ExpiresByType image/gif “access plus 1 month”
ExpiresByType image/png “access plus 1 month”
ExpiresByType image/jpg “access plus 1 month”
ExpiresByType image/jpeg “access plus 1 month”
# Set CSS Expiry
ExpiresByType text/css “access 1 month”
# For Javascript Expiry
ExpiresByType application/javascript “access plus 1 year”
</IfModule>
############################################
Now to enable the compression, uncomment this line of code in your default .htaccess file, so you’ll need to remove the # before php_flag zlib.output_compression on:
############################################
# enable resulting html compression
php_flag zlib.output_compression on
############################################
Next, to set gzip compression into action, we’ll add these lines into the .htaccess file:
############################################
# Inserting filter on all content
SetOutputFilter DEFLATE
# Inserting filter only on selected content types
AddOutputFilterByType DEFLATE text/html text/plain text/xml text/css text/javascript application/javascript
# Tackling some Netscape 4.x problems
BrowserMatch ^Mozilla/4 gzip-only-text/html
# Tackling some Netscape 4.06-4.08 problems
BrowserMatch ^Mozilla/4.0[678] no-gzip
# Scenario: MSIE masquerades as Netscape
BrowserMatch bMSIE !no-gzip !gzip-only-text/html
# Command for not compressing images
SetEnvIfNoCase Request_URI .(?:gif|jpe?g|png)$ no-gzip dont-vary
# Handling Proxies correctly
Header append Vary User-Agent env=!dont-vary
############################################
Some Useful Extensions:
There are lots of extensions available for Magento, which enable fast caching and will help to significantly reduce page load time, but there are two which are considered to be the best options. One is Turpentine, which is based on varnish, and the other is Magento Full Page Cache. Both are extremely good extensions. Plus, the key advantage of using Turpentine is that its free, but if you’re looking to achieve the best impact in terms of performance, Full Page Cache has proved to be much better than Turpentine, but it costs around €349.
Image optimisation
If you’re using large images on your site, chances are this is going to have a considerable impact on your performance, especially on image-heavy pages. I’d suggest serving your images via a CDN, such as CloudFlare or OnePica, which will mean your images are loaded from another server and will prevent unnecessary stress on your server when loading pages.
For more enterprise-level websites, I’d suggest using Cloudinary, which is an advanced image management solution that has the potential to reduce the load time associated with images considerably. Cloudinary serves all images via a fast CDN and also allows you to dynamically serve hi-res images and manipulate images on the fly via short URLs.
JPEGmini is another good resource that’s worth looking at for image compression.
Concluding Thoughts
I hope these simple steps will help you to substantially reduce your page load time. If you have followed this guide and put the steps into practice and measure your store’s page load time before and after the optimisation, you should see a clear improvement. Don’t forget to leave feedback in the comments section below – any further guidance would be greatly appreciated.
Here are a few other less major things that can be done to also help to improve performance:
- Avoid unnecessary redirects (adding redirects to the .htaccess will impact page load speed – this is a mistake that lots of merchants make when they re-platform and apply manual page-level redirects)
- Look at Memcache
- Use a simple, clean page template as a base
- Optimise your images
Additional reading:
- https://www.pinpointdesigns.co.uk/blog/magento-performance-optimisation/
- http://www.gxjansen.com/101-ways-to-speed-up-your-magento-e-commerce-website/
- http://www.slideshare.net/dmitriysoroka/methods-and-best-practices-for-high-performance-ecommerce
- http://www.mgt-commerce.com/blog/magento-on-steroids-best-practice-for-highest-performance/
- https://docs.nexcess.net/article/optimizing-magento-performance.html
- http://stackoverflow.com/questions/27110937/magento-varnish-turpentine-and-ssl
–
Also, I’d suggest looking at Varnish, Redis and Google Pagespeed as well, as these also represent great resources for improving performance.

5 Responses
Thank you for your great post!
There is a very useful Magento extension that I have been using for the past 2 years to speed up my Magento site: Defer JavaScript Extension from this site: http://bsscommerce.com/magento-defer-js-extension.html
This module helps to automatically defer parsing of Javascript till the last moment after all HTML and CSS loading. The reason is that a normal web page will render external JavaScript and CSS resources before HTML and the content of the page. Therefore, Magento sites will load slower than ever.
With Defer JavaScript extension, Magento sites can put all JavaScript files till the end of page to be loaded after HTML and CSS which can reduce loading time and speed up sites effectively without taking much time to make complicated code interfere.
After a period using this extension for my site, I find it very useful in enhancing web performance for user experience and also reduce bounced rate due to waiting so long for loading content before.
Magento is a great ecommerce framework. It has tons of features and you can really built a scalable ecommerce platform. I used magento in my latest project and faced this speed issue. After doing some research and modification i really speedup my website.
Server Optimization
Use Nginx as web server
Move mysql to different server with master-slave replica. If you are on AWS use RDS for mysql.
Optimize Nginx & Php-fpm
enable gzip compression
Enable Browser cache
Magento Settings
Disable all unnecessary extensions
Merge CSS and Javascript files
Disable Log
Clean up Magento log tables
Enable External full page cache
Install Redis Cache, APC Opcode & Full Page Cache extension – Install PHP Accelerators – Install Redis cache for backend & session caching – Install Lesti FPC
Image Optimization & YSlow – on an average 56 percent of a website’s page weight is made up of images. Optimizing your product images can dramatically increase the speed of your pages as this decreases their download times. – Scan your website through gtmetrix or Pingdom and follow their optimization suggestions.
Use CDN
You can read detail about this here : http://www.ranjeetvimal.com/tips-to-speed-up-magento-1-9-performance/
Hi Paul,
We have read your full Article.
It seems that you have covered almost all the main factors. Also you mentioned other reference URLs for related post, that thing is more useful for same topic.
Thanks again for very interesting post.
Hi Paul,
Definitely fantastic post, can i do something for google analytics leverage browser caching??
Thanks again
Thanks for the valuable information
You can also refer to the article https://www.cloudways.com/blog/magento-performance-guide/ for further detail guide of Magento performance