
Rich snippets represent a great way to make your existing organic visibility more efficient, by making your listings more compelling and visible to prospective users of your website. There are a number of different types of structured data that can help to illustrate relevance and authority for your pages and they have been proven to increase click-through rate in the majority of cases.
Implementing structured data in your Magento code will allow you to show important information related to your products, such as the number of reviews and the overall rating, price, category breadcrumb, video thumbnail etc. The code is simply added to your existing page templates in order to markup the individual attributes on the page.
Search Engines and Schema.org
Schema.org is a collective initiative by 3 of the biggest search engines; Google, Yahoo and Bing, which was introduced in 2011. This supports and creates a commonly used set of schemas for a structured set of mark-ups on web pages. Schema.org is the one-stop resource pool for webmasters. The mark-ups (stored within Schema.org) support the search engines to quickly recognise your website. Google originally announced their support for schema in 2009, but this has developed a lot since then. Newer schema mark-ups also include products, recipes, contact details, location, events and much more.
Explaining micro-data with a simple example
Structured data markups have 3 different standards; microformats, micro-data and RDFa. Google decided to simplify the process in order to maintain consistency across the different search engines. Micro-data strikes a balance between RDFa extendibility and the simplicity of microformats. Like other markup formats, micro-data, associated with schema, is applied to the page content. Schema elements and associated attributes can be directly added to the HTML code of a website page to provide additional information to the search engine’s crawlers. For example by adding itemscope in the div section of the html code we are specifying that the html content written within this section is about a particular subject.
<div itemscope>
<h1>Avatar</h1>
<span>Director: James Cameron (DOB Aug. 16, 1954) </span>
<span> Science Fiction </span>
<a href=”../movies/avatar-theatrical-trailer.html”> Trailer </a>
</div>
But this doesn’t tell you what is actually being described – the example below shows how you should use the specific schema to illustrate what the data is referring to.
<div itemscope itemtype=”http://schema.org/Movie”>
<h1>Avatar</h1>
<span property=“director” typeof=“Person”>James Cameron</span>
<span>Role: Director</span>
<span> Science Fiction </span>
<a href=”../movies/avatar-theatrical-trailer.html”> Trailer </a>
</div>
Now, by adding schema.org/movie, it’s clear that the items within the <div> tag is actually a movie. Once you’ve added the markup to your page, you should validate it using the rich snippet testing tool released by Google (this tool has also recently been re-launched with added fucntionality).
Implementing various schema mark-ups to Magento
Below is an example of a standard search engine listing from gsmarena.com.
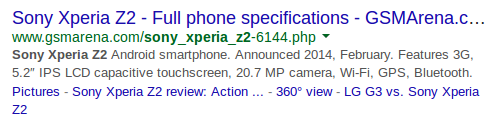
After implementing schema markup on the page, this result could look like this:

You can clearly see that this listing is far more compelling and is more likely to generate clicks from users browsing Google for reviews of the Sony Xperia Z2.
This article will be primarily focused on adding the product, price, product offer, aggregate rating, breadcrumbs, product URL and SKUs schemas into your Magento store. To add these snippets, you will need to edit the template files. Before editing them, do not forget to keep backups of these files.
You’ll find template files you need to edit in this location: Magento Root Directory/app/design/frontend/{namespace_name}/{theme_name}/template directory.
1. Implementation of Product schema
In the first place we should edit the view.phtml of our product page. This is to wrap the dynamic page of products within our new schema markup. Edit these lines of your catalog/product/view.phtml:
<div class = “product-view”>
//to
<div class = “product-view” itemscope itemtype = “http://schema.org/Product”>
//and
<h1> <?php echo $_helper-> productAttribute($_product, $_product-> getName(), ‘name’)?></h1>
//to
<h1 itemprop = “name”><?php echo $_helper-> productAttribute($_product, $_product-> getName(), ‘name’)?></h1>
In this way the catalog/product/view.phtml comes within the wrap of product type. Then we can tag product name (in this instance within the <h1> tag).
Now to tag product description we need to modify the following lines of code:
<div class=”std”><?php echo $_helper->productAttribute($_product, nl2br($_product->getShortDescription()), ‘short_description’) ?></div>
// change to
<div class=”std” itemprop=”description” ><?php echo $_helper->productAttribute($_product, nl2br($_product->getShortDescription()), ‘short_description’) ?></div>
Next we should tag the product image, which will mean us editong the catalog/product/view/media.phtml file:
$_img = ‘<img ….
// change to
$_img = ‘<img itemprop=”image”>
2. Implementing Aggregate schema
Aggregate schema will be displayed if your products have reviews (if the theme of your website supports reviews and if you’re using the Magento review functionality). We shall update the following codes of review/helper/summary.phtml
<div class=”ratings”>
// change to
<div class=”ratings” itemprop=”aggregateRating” itemscope itemtype= “http://schema.org/AggregateRating”>
The next step is to inform the search engine about your product’s best, average and worst review ratings, plus how many reviews they have in total. For this we’ll edit the following code.
// just underneath <div class=”ratings” add the following
<span class = “no-display” itemprop = “reviewCount”><?php echo $this->getReviewCount() ?> reviews </span>
// then just within <?php if ($this->getRatingSummary()):?> add the following
<span class = “no-display” itemprop = “worstRating”>0</span>
<span class = “no-display” itemprop = “bestRating”>0</span>
<span class = “no-display” itemprop = “ratingValue”><?php echo round($this->getRatingSummary()/20,1);?></span>
The above code will set 0 to 5 average ratings for your product.
3. Implementation of Offer schema
For adding the offer schema, we will need to edit a few files to bring out ‘availability’ and the ‘price’. For this we will need to add one hidden field within catalog/product/view.phtml (as we do not want to open the complex file of price.phtml).
// just underneath where we set our <h1 itemprop=”name” add the following
<?php if($_product->isAvailable()): ?>
<div class-“no-display” itemprop=”offers” itemscope itemtype=”http://schema.org/Offer”>
<span itemprop = “price”><?php echo Mage::helper(‘core’)->currency($_product->getFinalPrice());?></span>
</div>
<?php endif; ?>
The conditional if statement i.e. if($_product->isAvailable()): at first checks the availability of the product and then if found available, it will display its price.
4. Implementation of Product URL and SKU schema
To include the SKU and Product URL information, add the following code to view.phtml:
<meta itemprop= “url” content= “<?php echo $_product->getUrlModel()->getUrl($_product, array(‘_ignore_category’=>true’));?)” /> <meta itemprop= “sku” content= “<?php echo $_product->getSku() ?>” />
5. Implementation of breadcrumbs schema
Make a separate file called breadcrumbs.phtml in “template/page/breadcrumbs.phtml”. The code should be as follows:
<?php if($crumbs && is_array($crumbs)): ?>
<div class=”breadcrumbs”>
<ul xmlns:v=”http://rdf.data-vocabulary.org/#”>
<?php foreach($crumbs as $_crumbName=>$_crumbInfo): ?>
<li class=”<?php echo $_crumbName ?>” typeof=”v:Breadcrumb”>
<?php if($_crumbInfo[‘link’]): ?>
<a href=”<?php echo $_crumbInfo[‘link’] ?>” title=”<?php echo $this->htmlEscape($_crumbInfo[‘title’]) ?>” rel=”v:url” property=”v:title”>
<span><?php echo $this->htmlEscape($_crumbInfo[‘label’]) ?></span>
</a>
<?php elseif($_crumbInfo[‘last’]): ?>
<span rel=”v:child” property=”v:title”>
<strong><?php echo $this->htmlEscape($_crumbInfo[‘label’]) . ‘ for sale’ ?></strong>
</span>
<?php else: ?>
<span><?php echo $this->htmlEscape($_crumbInfo[‘label’]) ?></span>
<?php endif; ?>
<?php if(!$_crumbInfo[‘last’]): ?>
<span>/ </span>
<?php endif; ?>
</li>
<?php endforeach; ?>
</ul>
</div>
<?php endif; ?>
This code will add breadcrumbs into your store’s result on SERPs.
Validating the markup
While implementing these schemas, it is important to test the web pages using rich snippets testing tool. The testing tool will display the parsed mark-up information from the page. Now as soon as you have added and tested the mark-up, Google will find it the next time it crawls your website.
Just copy the URL of your web page into the ‘Fetch URL’ field of the Google Developers Testing Tool (https://developers.google.com/structured-data/testing-tool/) and click on the ‘Fetch & Validate’ button. Using this URL as an example http://www.keepshooting.com/finnish-m-61-military-gas-mask.html you can see what was reported below:
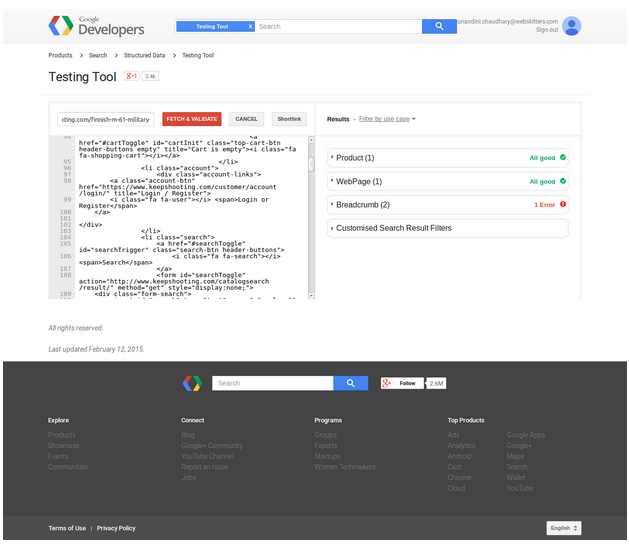
Alternatively, you can just copy the source code of your web-page into the input text box and click the ‘Validate’ button. Bing also have a validation tool, which can be found here.
Magento rich snippet extensions
To avoid the complexity of doing this manually, you can take advantage of some of the existing modules available, which can be seen below.
- Google Rich Snippets v1.2.2 (https://amasty.com/magento-google-rich-snippets.html)
- Magento Rich Snippets Extension (http://www.fmeaddons.com/magento/rich-snippets-extension.html)
- Rich Snippet Suite (http://www.magmodules.eu/schema-org-rich-snippets.html)
Concluding Thoughts:
Implementing rich snippets on your website will help to improve your click-through rate across a number of different page types – with some schemas said to impact CTR by up to 40%.
Here are some additional resources around implementing micro-data and schema.org:
- http://builtvisible.com/micro-data-schema-org-guide-generating-rich-snippets/
- http://blog.raventools.com/an-seos-guide-to-schema-org/
- http://schema.org/docs/gs.html
If you do choose to use any of the suggestions from this article, please ensure that you take backups and test everything thoroughly before pushing to your live environment.

7 Responses
This code causes a fatal error: “unexpected “?” on line 326:
<meta itemprop= “url” content= “getUrlModel()->getUrl($_product, array(‘_ignore_category’=>true’));?)” /> <meta itemprop= “sku” content= “getSku() ?>” />
I think it’s because you have ?)” /> instead of ?>” /> on the first line. I added this code at the very end of the file since you didn’t give any specific instructions where to add it.
But even after fixing that, some of your other modified code in view.phtml causes another fatal error on my product pages:
Fatal error: Class ‘Mage_‘core’_Helper_Data’ not found in /home/customj/public_html/app/Mage.php on line 547
Any idea why?
Note: you can’t use the “Ask me a question” feature because there is no button to submit the question.
Works in magento 2 as well?
Hi, code works, but google does not like my comma as a decimal separator. It tells me to use a dot. eg 49.00 and not 49,00. Im using a danish Magento. Can I somehow convert from comma to dot in the above code?
For me this line:
productAttribute($_product, nl2br($_product->getShortDescription()), ‘short_description’) ?>
is actually this:
productAttribute($_product, $_product->getShortDescription(), ‘short_description’) ?>
Slightly different. Instead of ‘ nl2br’ I have a second ‘$_product’. Will your code still work the same in this case?
I have made changes as recommended:
But when I’m testing the page, it gives me an error: The attribute itemtype has an invalid value.
Please help.
Followed above steps, and added:
On validating via the link: https://search.google.com/structured-data/testing-tool/
It says: The attribute itemtype has an invalid value.